Introducing Photoshop (Part 1)
Hi Everyone,
I would like to write some important topics which are essential for you to get started with Photoshop. To be honest, the version doesn't really matter that much. The stuffs you will learn from here can be applied to any version of photoshop.
Here are topics I'm going to cover in this today's blog post :
• Setting up your computer
• Photoshop CS6 interface
• Customising the workspace
• Using Tools panel
• Using Options Bar
Now, let's get started.
Computer setup
Before you start working in Photoshop, or even before you install it, you need to make sure that your computer is optimized for Photoshop. Nowadays, almost any computer you buy will be fine for doing some Photoshop work. Obviously, if you plan on doing some more demanding things in Photoshop like working with 3D images, you will need a better, more powerful computer. But for what we are going to do here, almost any computer nowadays will be fine. There is less distinction between Mac and Windows computers nowadays. If you have quite a recent computer, it doesn’t matter whether you run Windows or Mac. It comes down more to memory and graphics card and both systems are very good, so I’m going to avoid the discussion whether Mac is really better.
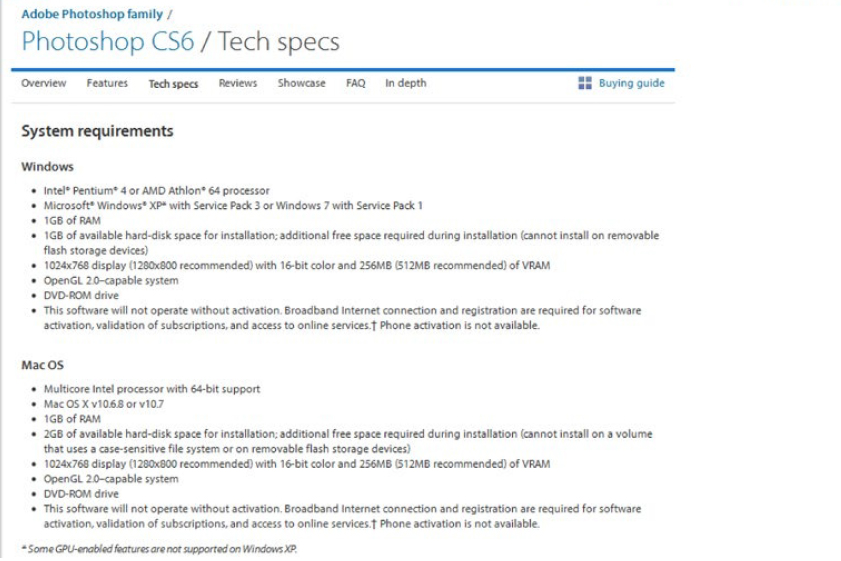
There are some requirements for Photoshop CS6 that I’m going to discuss now. Here are the minimum requirements for Photoshop CS6:
NOTE: The minimum requirements for Photoshop CS6 for RAM memory are 1GB, however I would recommend getting at least 3 or 4GB of RAM. If you have 4GB of RAM or more, you can take the advantage of more memory and run 64-bit version of your operating system and installing 64-bit version of Photoshop. If you run 32-bit operating system, it can only use up to 3.3 - 3.5GB of RAM. However, if you run 64-bit operating system, it can use any amount of RAM you have installed.
Monitor
Choosing a monitor is one of important decisions to make as you are going to spend a lot of time in front of it. The only monitors you can buy nowadays are LCD or LED monitors. These monitors are usually with more contrast as CRT monitors were in the past, which is good. They produce more consistent color as well as they are digital devices. These monitors can also be calibrated, but I’m not going to go into details here. As to which monitor to choose, it really depends on how big you want it to be (the size will be determined on how far from the monitor you’re going to sit).
It goes like this: monitor screen size x 3 = distance, i.e. if you have 20” monitor, you should be sitting 60”(1.5m) from it.
Photoshop Interface
Photoshop CS6 interface has a lot in common with other Adobe Creative Suite 6 applications. And now you can also work with a single application window in Photoshop on both Windows and Mac.
Thanks to the Application Frame on Mac (that’s the feature that makes Photoshop’s interface on Mac look very similar to the one on Windows), you can work with images that open in tabs.
If you’re wondering how to launch Application Frame on Mac, go to Window > Application Frame.
Have a look on the next page to see what Photoshop CS6 interface looks like on Windows and Mac.
Note: Photoshop CC interface looks the same as Photoshop CS6 interface.
All the panels in Photoshop appear on the right side of the interface, in the area called Panel Dock. The Tools panel appears on the left side of the interface, and the Options bar runs across the interface on the top, directly below the application menu.
Customizing the Workspace
One of many amazing features in Adobe Photoshop (and other Adobe applications) is the ability to customize the workspace, to make it look the way you want it. Workspaces are created to use alternative layouts and placement of interface elements. Photoshop comes with a set of workspaces to get you started. There are two ways of accessing workspaces:
through the menu: Window > Workspace:
Or, using the Workspace Switcher :
1. Take a moment and look at different workspaces and notice how the Photoshop interface changes, how the panels inside the Panel Dock change.
2. Change the workspace back to Essentials, which is default.
3. For the exercising we won’t need the Color panel so click and hold on the name of the panel and drag it out from the Panel Dock. When your cursor appears over the document window, release the mouse button:
4. Close the Color panel by clicking the close button (top right corner on Windows, top left corner on Mac). Back to Panel Dock, you will drop Swatches panel into Adjustments panel.
5. Click and hold on Swatches name and drag the panel into Adjustments panel below. When you see a border around the Adjustments panel, release the mouse button:
Swatches panel now appears docked with Adjustments panel as shown here:
6. You can resize panels by placing the cursor between Swatches panel and Layers panel below and when the cursor changes to double-arrow, click and drag up and down.
7. You can change the position of the panels in a group (in this case Swatches, Styles, and Adjustments) by clicking on the panel’s name and dragging it to left or right.
8. It’s time to save the workspace. Choose Window > Workspace > New Workspace.
9. In New Workspace dialogue box type a name for your workspace and click Save:
Congratulations! You have successfully created your own workspace. In the next few steps you are going to explore the Tools panel.
Photoshop Tools Panel
Photoshop’s Tools panel contains lots of tools, some of them hidden in groups. Any of the tools having a little triangle in the corner contains an expandable group, as shown here:
To access tools within a group, click on the tool and hold the mouse button down. In just a second or so the drop-down menu will appear like the one shown above.
Most tools also have keyboard shortcuts assigned to them, one of the letters on the keyboard.
Note: If you don’t see the names of the tools and keyboard shortcuts next to them as you mouse over the tools, check your Preferences > Interface category and make sure that
the option Show Tool Tips is selected:
Because most tools have keyboard shortcuts, you can use keyboard shortcuts to access the tools.
Note: Remember that you may need to hold Shift key with the letter on the keyboard to switch between tools depending on your settings in Preferences > General for Use Shift Key for Tool Switch:
Note: The tools panel in Photoshop CC is the same.
10. Give different tools a try using keyboard shortcuts, i.e. V for Move Tool or L for Lasso Tool etc. Talking about Tools panel and Tools we cannot forget about the Options bar.
Options Bar
Let’s start with the position of the Options Bar. Options Bar appears near the top of the application frame, on top of the document window:
Options Bar displays the options for your currently selected tool, I like to call Options Bar being “context-sensitive”. The reason being that the options inside the options bar change depending on the tool you have selected.
11. Try clicking on different tools on the Tools panel and notice how the Options bar changes. Sometimes Options bar will display the tick icon and cancel icon like these:
They appear when you use tools or options where you need to either accept or cancel what you have done. An example here is the Transform option (Edit > Transform).
I will write more about the following topics in the next blog.
• Documents management
• Photoshop preferences
• Color Settings
• History
Keep visiting, keep reading and keep growing your photoshop knowledge.
- Dominika.
I would like to write some important topics which are essential for you to get started with Photoshop. To be honest, the version doesn't really matter that much. The stuffs you will learn from here can be applied to any version of photoshop.
Here are topics I'm going to cover in this today's blog post :
• Setting up your computer
• Photoshop CS6 interface
• Customising the workspace
• Using Tools panel
• Using Options Bar
Now, let's get started.
Computer setup
Before you start working in Photoshop, or even before you install it, you need to make sure that your computer is optimized for Photoshop. Nowadays, almost any computer you buy will be fine for doing some Photoshop work. Obviously, if you plan on doing some more demanding things in Photoshop like working with 3D images, you will need a better, more powerful computer. But for what we are going to do here, almost any computer nowadays will be fine. There is less distinction between Mac and Windows computers nowadays. If you have quite a recent computer, it doesn’t matter whether you run Windows or Mac. It comes down more to memory and graphics card and both systems are very good, so I’m going to avoid the discussion whether Mac is really better.
There are some requirements for Photoshop CS6 that I’m going to discuss now. Here are the minimum requirements for Photoshop CS6:
NOTE: The minimum requirements for Photoshop CS6 for RAM memory are 1GB, however I would recommend getting at least 3 or 4GB of RAM. If you have 4GB of RAM or more, you can take the advantage of more memory and run 64-bit version of your operating system and installing 64-bit version of Photoshop. If you run 32-bit operating system, it can only use up to 3.3 - 3.5GB of RAM. However, if you run 64-bit operating system, it can use any amount of RAM you have installed.
Monitor
Choosing a monitor is one of important decisions to make as you are going to spend a lot of time in front of it. The only monitors you can buy nowadays are LCD or LED monitors. These monitors are usually with more contrast as CRT monitors were in the past, which is good. They produce more consistent color as well as they are digital devices. These monitors can also be calibrated, but I’m not going to go into details here. As to which monitor to choose, it really depends on how big you want it to be (the size will be determined on how far from the monitor you’re going to sit).
It goes like this: monitor screen size x 3 = distance, i.e. if you have 20” monitor, you should be sitting 60”(1.5m) from it.
Photoshop Interface
Photoshop CS6 interface has a lot in common with other Adobe Creative Suite 6 applications. And now you can also work with a single application window in Photoshop on both Windows and Mac.
Thanks to the Application Frame on Mac (that’s the feature that makes Photoshop’s interface on Mac look very similar to the one on Windows), you can work with images that open in tabs.
If you’re wondering how to launch Application Frame on Mac, go to Window > Application Frame.
Have a look on the next page to see what Photoshop CS6 interface looks like on Windows and Mac.
 |
| Photoshop CS6 on Windows |
 |
| Photoshop CS6 on Mac |
Note: Photoshop CC interface looks the same as Photoshop CS6 interface.
All the panels in Photoshop appear on the right side of the interface, in the area called Panel Dock. The Tools panel appears on the left side of the interface, and the Options bar runs across the interface on the top, directly below the application menu.
Customizing the Workspace
One of many amazing features in Adobe Photoshop (and other Adobe applications) is the ability to customize the workspace, to make it look the way you want it. Workspaces are created to use alternative layouts and placement of interface elements. Photoshop comes with a set of workspaces to get you started. There are two ways of accessing workspaces:
through the menu: Window > Workspace:
Or, using the Workspace Switcher :
1. Take a moment and look at different workspaces and notice how the Photoshop interface changes, how the panels inside the Panel Dock change.
2. Change the workspace back to Essentials, which is default.
3. For the exercising we won’t need the Color panel so click and hold on the name of the panel and drag it out from the Panel Dock. When your cursor appears over the document window, release the mouse button:
4. Close the Color panel by clicking the close button (top right corner on Windows, top left corner on Mac). Back to Panel Dock, you will drop Swatches panel into Adjustments panel.
5. Click and hold on Swatches name and drag the panel into Adjustments panel below. When you see a border around the Adjustments panel, release the mouse button:
Swatches panel now appears docked with Adjustments panel as shown here:
6. You can resize panels by placing the cursor between Swatches panel and Layers panel below and when the cursor changes to double-arrow, click and drag up and down.
7. You can change the position of the panels in a group (in this case Swatches, Styles, and Adjustments) by clicking on the panel’s name and dragging it to left or right.
8. It’s time to save the workspace. Choose Window > Workspace > New Workspace.
9. In New Workspace dialogue box type a name for your workspace and click Save:
Congratulations! You have successfully created your own workspace. In the next few steps you are going to explore the Tools panel.
Photoshop Tools Panel
Photoshop’s Tools panel contains lots of tools, some of them hidden in groups. Any of the tools having a little triangle in the corner contains an expandable group, as shown here:
To access tools within a group, click on the tool and hold the mouse button down. In just a second or so the drop-down menu will appear like the one shown above.
Most tools also have keyboard shortcuts assigned to them, one of the letters on the keyboard.
Note: If you don’t see the names of the tools and keyboard shortcuts next to them as you mouse over the tools, check your Preferences > Interface category and make sure that
the option Show Tool Tips is selected:
Because most tools have keyboard shortcuts, you can use keyboard shortcuts to access the tools.
Note: Remember that you may need to hold Shift key with the letter on the keyboard to switch between tools depending on your settings in Preferences > General for Use Shift Key for Tool Switch:
Note: The tools panel in Photoshop CC is the same.
10. Give different tools a try using keyboard shortcuts, i.e. V for Move Tool or L for Lasso Tool etc. Talking about Tools panel and Tools we cannot forget about the Options bar.
Options Bar
Let’s start with the position of the Options Bar. Options Bar appears near the top of the application frame, on top of the document window:
Options Bar displays the options for your currently selected tool, I like to call Options Bar being “context-sensitive”. The reason being that the options inside the options bar change depending on the tool you have selected.
11. Try clicking on different tools on the Tools panel and notice how the Options bar changes. Sometimes Options bar will display the tick icon and cancel icon like these:
They appear when you use tools or options where you need to either accept or cancel what you have done. An example here is the Transform option (Edit > Transform).
I will write more about the following topics in the next blog.
• Documents management
• Photoshop preferences
• Color Settings
• History
Keep visiting, keep reading and keep growing your photoshop knowledge.
- Dominika.


Comments
Post a Comment